Thinking about installing under-cabinet lights in your kitchen? If so, good for you—you’re considering making a choice that comes with a lot of benefits. If you’ve never thought about under-cabinet lighting before, maybe this guide will give you some ideas.
You don’t have to be currently remodeling your kitchen to put in some under-cabinet lights, and they can benefit you in so many ways, including:
- Enhancing Value: Want to make your house look more appealing to potential buyers? Under-cabinet lighting has a way of making your kitchen area literally shine and put its best foot forward.
- Providing Light: Under-cabinet lights are installed to light up counter space and corners of your kitchen that might usually be difficult to see. This is especially useful when you’re trying to prepare a meal.
- Lowering Your Energy Bill: The type of lights you install under your cabinets can help you save money, especially energy-savers like LED lights. In addition, when you have under-cabinet lights to illuminate the countertops, you might not use your full kitchen lights as often and therefore lower your energy bill.
Beyond these benefits, under-cabinet lighting is affordable and easy to install—especially for experienced DIYers. It’s so easy, in fact, that we’ll break down how to install under-cabinet lighting for you right now.
Select Your Lights
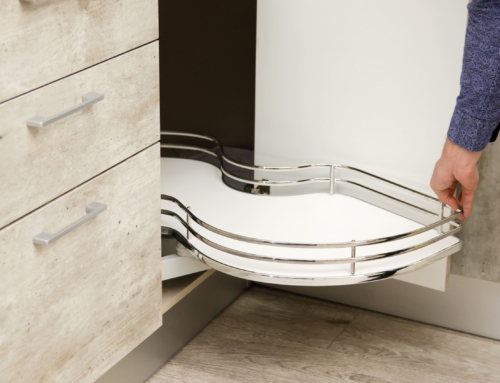
There are three distinct types of under-cabinet lighting: puck lights, light bars, and tape lights. Puck lights are round or oval LED lights that are either battery-charged or plug into an outlet. A light bar is a long strip of under-cabinet LED lights that comes in differing lengths to perfectly match the length of your cabinets. Tape lights come in spools that you can unwind and stick into place thanks to its adhesive backing.
For the purposes of this article, we’ll proceed as if you’ve decided to install light strips or bars to the undersides of your cabinets.
Pre-Installation Preparation
To install your under-cabinet lights, you’ll need to have access to the following tools and materials:
Tools:
- Wire Stripper/Cutter
- Cordless Drill
- Pliers
Materials:
- Under-Cabinet Lights
- Electrical Tape
- Remodeling Switch Box
- Cable Clamps
This is a general list of materials and tools you’ll possibly need—all of which you can get from a hardware store. Specifics vary based on the actual type of under-cabinet light you’re wanting to install.
Cable Placement, Connection, and Hole Cutting
Start your cabinet installation process by turning off all active electrical power near the area you’ll be working on.
You’ll then need to map out where you’ll be drilling your holes for the wiring. Try to drill as few holes as possible, hiding them behind any type of removable backsplash or recognizing that you’ll have to paint over some areas.
You’ll also need to know where you’ll be cutting your holes for the switchbox. You will need to have a cable run to it from a nearby power outlet.
Know where the cable will enter and leave for each light and plan accordingly. Once you’ve planned it all out, start cutting the holes and running the cables from the hole of the switchbox to the first light, then from the first light to the second light, etc. Thread about 14-16 inches of cable through the holes and leave it there so you’ll have plenty of slack to work with when connecting the lights with the power.
Attach and Wire the Lights
To put the LED light strips on, you’ll need to partially dismantle them first. Remove the lens and fluorescent tubes so that you’re left with just the light frame.
You’ll need clamps and screws for this next part. Clamp the cables to the light and then hold the frame as close to the back wall as possible while you use a drill or screwdriver to screw it in place beneath the cabinet. Take care to not use screws so long that they’ll come up through the bottom of your cabinets.
The next step is to wire the lights. Plan ahead so that the wires don’t come within an inch of the ballast. Then splice the wires of the light with the wires you’ve previously threaded through the cables, matching the colors up (i.e. white with white, etc.). You’ll have to press the wires in the light down in order to place the bottom part of the light back in the frame.
Install Switch Box
Install the switch box in the hole you cut out for it. Clamp the origin cables to the switch box and splice the white wires together. Attach each black wire to a single pole switch. Then connect the ground wire to the switch. You can wrap the body of the switch up with tape to keep the power terminals protected.